A. Introduction
This tutorial explains how to upgrade to a newer release of Linux Mint.B. General considerations
B1. Do you need to upgrade?
If things are working fine and you're happy with your current system, then you don't need to upgrade.A new version of Linux Mint is released every 6 months. It usually comes with new features and improvements but there's nothing wrong with sticking with the release you already have. In fact, you could skip many releases and stick with the version that works for you.
Each release receives bug fixes and security updates for about 18 months (or 3 years in the case of "Long Term Support" releases such as Linux Mint 5 or Linux Mint 9). The development team is also focused on the latest release. If bug fixes and security updates are important to you, you should regularly upgrade to the latest releases, otherwise there's nothing wrong with keeping things as they are.
As a general rule... unless you need to, or unless you really want to, there's no reason for you to upgrade.
B2. Important aspects
The most important things when it comes to upgrading are:- That your data is safe
- That you end up with a fully functional system
So. No matter what way you're going to upgrade. The first thing to do is to make a backup of your data.
You'll also want to make sure that the release you're upgrading to is right for you. Every release comes with a different kernel. This means that it handles hardware differently. For instance, you may find out that a graphic card or a wireless adapter which currently works fine for you under Linux Mint, isn't recognized by the newer version of Linux Mint you're planning to upgrade to. In some cases, this could mean that upgrading to this release is the wrong decision, maybe you're better off skipping that particular release? There's only one way to know: you need to try it.
Linux Mint comes as a liveCD. Thanks to this, you can try the newer release on your computer and see if your hardware is recognized before proceeding to the upgrade.
To be safe:
- Make a full backup of your data on an external device (USB stick or CD/DVD)
- Download and burn the liveCD of the newer release, and check that your hardware is fully functional with it.
C. The different ways of upgrading
There are many different ways of upgrading to a newer release but we can categorize them in two different families: "fresh" and "package" upgrades.C1. "Fresh" upgrades
In a "fresh" upgrade you use the liveCD of the new release to perform a new installation and to overwrite your existing partitions.A "Fresh" upgrade consists of the following steps:
- Making a backup of the data
- Making a backup of the software selection
- Performing a fresh installation using the liveCD of the new release
- Restoring the data
- Restoring the software selection
- Safe: Your data is backed up externally. Whatever mistake you make or whatever bug happens during the installation cannot affect it.
- Fast: The installation usually lasts 10 minutes. The CD for the new release is less than 700MB and it contains about 3GB of compressed data. Downloading the ISO and upgrading from the CD is much faster than upgrading the system from the repositories.
- Reliable: First, you get the opportunity to test your hardware detection in the new release using the liveCD. If anything is wrong you can simply decide not to upgrade, it's not too late. Second, you end up with a fresh installation of Linux Mint, i.e. a system that was fully tested by the development team and the community.
- Easy: Things do go as planned this way.
C2. "Package" upgrades
A "package" upgrade consists of the following steps:- Pointing APT to the repositories of the newer release
- Asking APT to perform a full upgrade
This way of upgrading Linux Mint should only be recommended to advanced users.
Here are the pros and cons of upgrading the system this way:
Cons:
- Slow: APT will download the new version of all the packages installed on your system. Assuming you installed nothing at all, that's about 3GB of data.... using a fresh upgrade you could have downloaded all that data by simply getting the 700MB ISO.
- Unreliable: Depending on your modifications, your sources, your added software and your configuration you could end up with a system that acts and feels really different than a brand new version of the newer Linux Mint release. You're far from the beaten track and the added features might not work as well on your system as they were designed to.
- Risky: The temptation when you upgrade with APT is not to perform backups... since your partitions aren't overwritten, nothing "forces" you to make backups... think about the risk though.
- Complicated: Packages conflict with each others, they can bring complex dependencies and put you in situations that are difficult to solve.
- Automated: APT does everything for you (well, until something goes wrong of course)
- Real upgrade: A "fresh" upgrade is kind of like the new Linux Mint with your data on it... this in comparison feels more like "your system" running the newer version underneath.
D. How to upgrade
In this tutorial we'll use a "fresh" upgrade.D1. Make a backup of your existing system
You need to save your personal data and your software selection: Your personal data, simply because you don't want to lose it... and your software selection, because post-installation you don't want to have to reinstall all the applications you've added to your system.D1.1 Get a recent version of mintBackup
If you are running Linux Mint 9 or a later version, you can skip this paragraph and move to section D1.2.If you are running Linux Mint 8, do the following:
- Launch Firefox and go to http://packages.linuxmint.com/list.php?release=Isadora
- Find the line for "mintbackup" and click on "all" in the "DEB" column to download the package
- Once downloaded on your computer, double click the .deb file to install mintBackup.
- Download mintBackup from here: http://packages.linuxmint.com/pool/romeo/m/mintbackup/mintbackup_2.0.2-mint5-1_all.deb
- Find the line for "mintbackup" and click on "all" in the "DEB" column to download the package
- Once downloaded on your computer, double click the .deb file to install mintBackup.
D1.2 Backup your data
Open mintBackup from the Menu -> Administration -> Backup Tool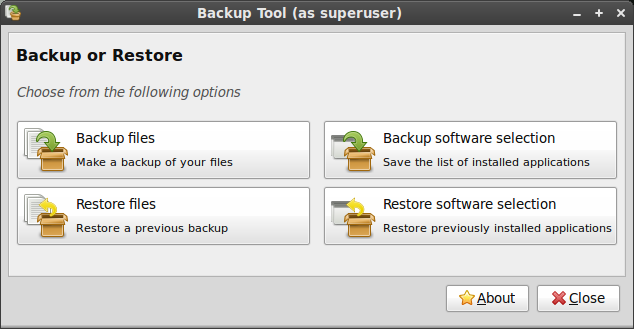
Click on "Backup files".
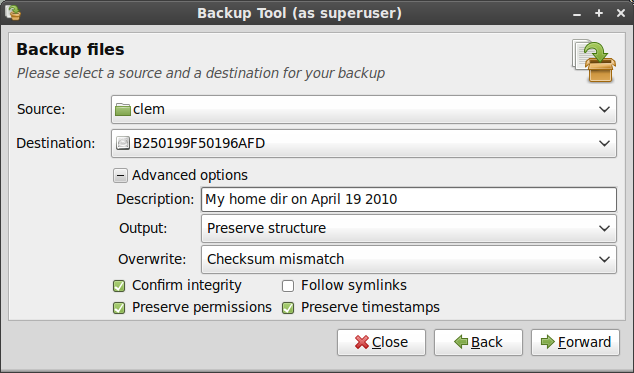
- Select your home directory for the source.
- Select where you want to backup the files as your destination (ideally some external volume since the plan is to format this partition during the installation)
- In the advanced options choose the following:
- A description (that's always a good idea to add to a backup)
- The output format (whether you want to save the backup as a directory, or an archive... archives take longer but if you plan to backup to NTFS/FAT volumes, archives preserve permissions that cannot be preserved by directories on these Windows filesystems)
- Overwrite (you can ignore this setting, it only comes into play if you plan to update an already made backup)
- Confirm integrity: slower but more reliable, it checks the signature of each file after it was backed up.
- Preserve permissions and timestamps: This should be selected.
- Follow symlinks: Not needed.
- Click "Forward"
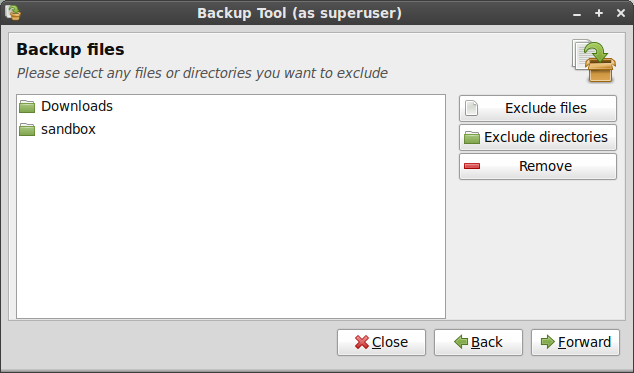
To save space and time, exclude things you don't need. For instance, I don't need to backup my "sandbox" and "Downloads" directories, but that's just me.
When you're ready, click "Forward".
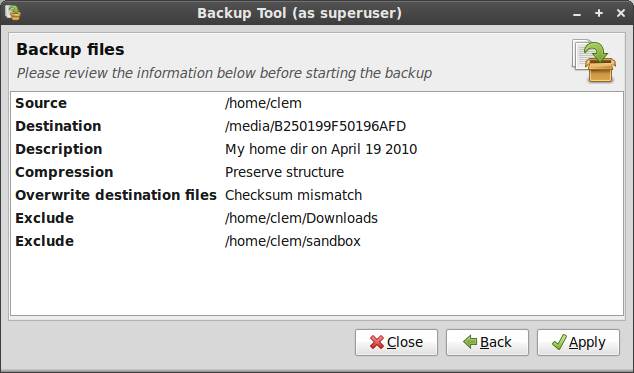
Review the information about your backup and press "Apply".
Note: When the backup is finished. Make absolutely sure to check the result yourself. No matter how much trust you put in the backup tool, head towards the destination, and check that all your files and directories were backed up successfully. If you chose to backup as an archive, make sure to open it up to see if it's working and whether or not it contains everything that it should. The tool is stable, but there can always be a bug or you could have made a mistake... since we're talking about your data here, make absolutely sure before anything else.
D1.3 Backup your software selection
Open mintBackup from the Menu -> Administration -> Backup ToolClick on "Backup software selection".
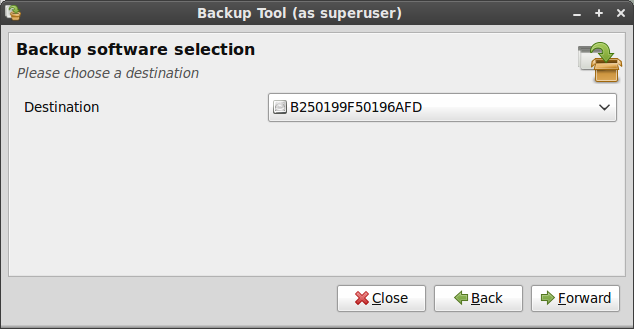
Choose a destination (ideally some external volume since the plan is to format this partition during the installation).
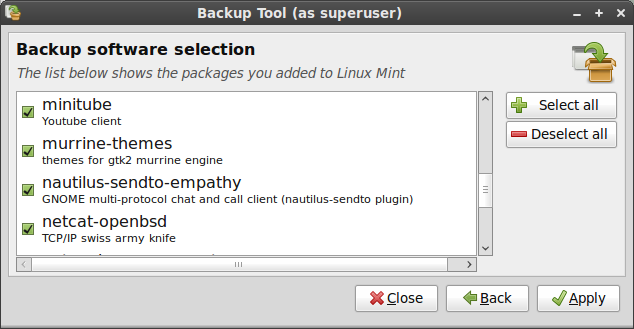
The following screen shows you all the packages you added to your Linux Mint system. Select the ones you want to exclude from your backup and click "Apply".
Note: When the backup is finished (it shouldn't take long), go to the destination and check for a file which name starts with "software_selection". This is the backup of your software selection.
D2. Test and install the newer version of Linux Mint
- Download the ISO for the newer version of Linux Mint.
- Check its MD5 signature.
- Burn it at low speed on a liveCD.
- Boot from the liveCD and select the option "Check disk integrity".
- Boot from the liveCD and select "Start Linux Mint".
- Once on the live desktop, check that your hardware is properly recognized (graphics card, wireless..etc)
- Once you're happy and confident that this newer release is good for you, click on "Install" on the desktop and proceed with a normal installation.
- When asked by the installer, choose "Specify partitions manually (advanced)", select the partition that you used for your current installation of Linux Mint, assign "/" to it, and reformat it to "ext4".
D3. Restore your data and your software selection
D3.1Restore your data
Open mintBackup from the Menu -> Administration -> Backup ToolClick on "Restore files".
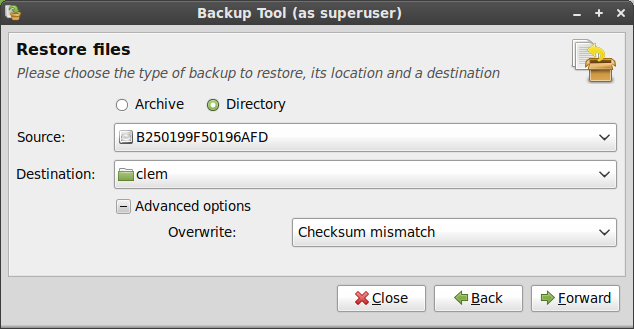
If you backed up your data as an archive, choose "Archive", otherwise choose "Directory", then point the source to either your archive or the location where you made the backup of your data.
Set your new home folder as the destination.
You can ignore the advanced options since your home folder is empty at the moment. These settings are only there to optimize things for people running regular backups.
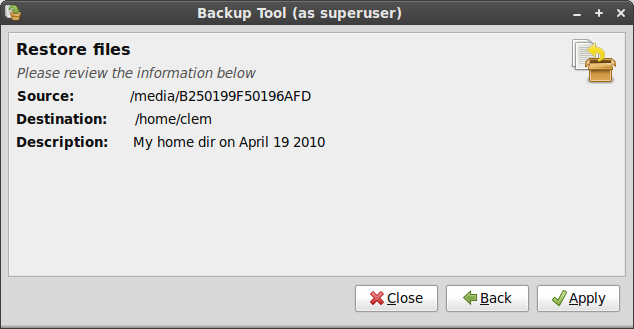
Review the information and press "Apply" when ready.
D3.2 Restore your software selection
Open mintBackup from the Menu -> Administration -> Backup ToolClick on "Restore software selection".
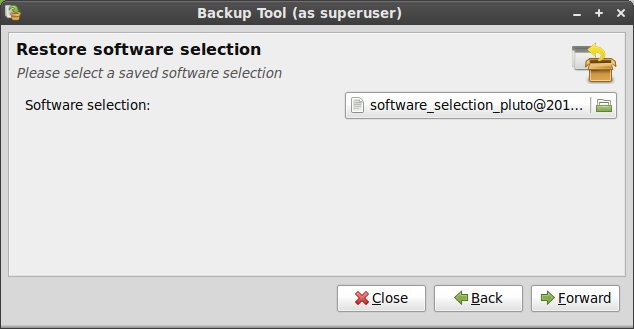
Select your backed up software selection file and press "Forward".

In the next screen you can see a list of packages. Select the ones you want to install and press "Apply".
This list only contains packages which were part of your previous software selection and which are not installed in the present system. The packages which are already installed in your new system don't need to be installed again, so they don't appear in this list.
At any moment, you can press the "Close" button. You don't have to install everything. If you change your mind later on, just launch the Backup tool again and restore your software selection using the same backup, the list will appear and show you the packages you're missing.
If you were using PPA or other repositories and if some of your previously installed packages are not found by the present system, these packages will appear in the list but you won't be able to select them. If that is the case, update your APT sources using the Menu -> Administration -> Software Sources tool to add the missing repositories, then click on the "Refresh" button in the Backup Tool.
Note: The "Refresh" button refreshes the list, not your APT cache. If you update your /etc/apt/sources.list manually, make sure to run "apt update" in the terminal.
E. Frequently Asked Questions
E1. Why doesn't Linux Mint upgrade the way Ubuntu does?
From our point of view, Ubuntu does three things wrong:- It doesn't make it easy for you to backup your data, nor does it warn you to do so.
- It automatically asks you to upgrade to the latest version. You click on the "upgrade" button and there's no turning back. No explanation about the risks involved, no explanation about the pros and cons... just a simple button to click for a process you likely don't understand.
- It uses a "package" upgrade method. See section C2 for pros and cons associated with this method.
E2. Wouldn't it be better if Mint was a rolling distribution?
Yes and no.A "rolling" distribution is a distribution which doesn't jump from release to release, packages are continuously updated. Thanks to this, users do not need to upgrade to any newer release of course, but the trade-off is stability and pace. It's easier to test a system when it's "frozen". With a moving base of packages, each new change can potentially introduce problems with the other packages... on a distribution featuring more than 30,000 packages it would take days to perform a full regression test after each package update!
Debian is a good example of this. The stable branch is a frozen snapshot of the testing branch. The testing branch itself isn't considered fully stable and it can take a while before some new packages appear into it. Of course, thanks to the nature of rolling distributions, any regression introduced by a new package can be fixed a few days later. Overall, rolling distributions are quite stable, as users are quick to report broken features and developers are quick to fix them... problems happen, and they get fixed.
With a frozen base, there's a lot of testing going on, after which things are not likely to break. This also gives the distribution 6 months between each releases where the developers don't need to worry about upgrades and can spend their time on development and innovation.
Most distributions available nowadays adopt a release cycle. Notable exceptions include Debian (excluding the "Stable" branch which isn't considered a "rolling" distribution), Arch Linux, Gentoo, PCLinuxOS, Sidux and Foresight Linux.
Tidak ada komentar:
Posting Komentar